Wednesday, August 13, 2025
Sunday, July 27, 2025
Monday, December 16, 2024
Sunday, July 28, 2024
Sunday, July 21, 2024
Wednesday, May 22, 2024
Sunday, January 7, 2024
Tuesday, December 19, 2023
Saturday, October 21, 2023
Thursday, September 21, 2023
Tuesday, September 5, 2023
Saturday, September 2, 2023
About Me
TriggerBlock is a cool tech blog that's all about helping you out with tutorials, problem-solving, hacks, and quick fixes for different coding languages and techie stuff like Java, Python, Scala, Kubernetes, and more. They've got plenty of articles on testing too. Check it out!
Thursday, March 16, 2023
Thursday, February 16, 2023
Wednesday, January 18, 2023
Tuesday, June 21, 2022
Thursday, May 26, 2022
Monday, May 16, 2022
Build Jar : Add multiple class files in the Jar using Bazel
Add multiple class files in the Jar using Bazel
Thursday, May 12, 2022
Azure Synapse - Working with Custom jar Scala (Bazel)
Working with Custom jar in Azure
There is 2 Jars :
- Big Fat Jar or uber Jar (Contains main class )
- Build Dependency Jar/ Library to be used in Synapse
Big Fat Jar or uber Jar:
- Contains main class
- Contains all the Dependency
- Contains manifest File
- $ bazel build build_name_deploy.jar
- Can be run as : build_name_deploy.jar
- Eg: https://github.com/j-thepac/BazelTestProject
- Ref - https://docs.bazel.build/versions/main/be/java.html
Build Dependency Jar/ Library
- Does not Contain main class
- Does not contain dependencies
- Note : Download external dependencies from Maven and upload it separately (refer bewlo link)
- $ bazel build build_name.jar
Friday, May 6, 2022
Azure Synapse : Passing and receiving Values to and from Notebooks
Passing and receiving Values to and from Notebooks
Friday, April 22, 2022
Saturday, March 12, 2022
Thursday, January 20, 2022
Sunday, January 9, 2022
Saturday, January 8, 2022
Azure Linux VM
Azure Linux VM Connection
pre-Req:
- For Mac Users
- Make sure linux machine is created
Steps:
- Open Linux Machine Panel
- Go to Settings > Connect > SSH
- Click on other Clients
- From the new page opened , Copy Create an SSH key Pair "ssh-keygen -m PEM -t rsa -b 4096"
- Run "ssh-keygen -m PEM -t rsa -b 4096" in Terminal
- Click Enter all the times
Testing Connection
- In the previous page , enter the path of the id_rsa.pub Eg : "~/.ssh/id_rsa.pub" or "(if u have added the file in a new folder ) ~/.ssh/vm_linux/pushpa/id_rsa.pub "
- click on "test your connection"
- Your unsaved edits will be discarded , ck Yes
- Ck on Test Connection
- this shd pass
Connection:
- Settings > Connect > SSH
- copy the run example ie ., ssh -i <private key path> pushpaxxxxx@1xx.xx.1xx.xx
- Replace the privae key path to ids_rsa which was created
- Make sure u give the azure account password when asked
Install Python3
- sudo su
- <azure password>
- yum install python3
- pip3 install requests
Monday, January 3, 2022
Saturday, November 20, 2021
Friday, October 22, 2021
Scala Advanced
Scala Advanced
Generics
trait A
class B extends A
class C extends B
object LowerBoundGeneric extends App {
class Test[A >: B](val x: A) //Can have of type A and B not
C
val temp = new B() // new C() = Fail
val test: Test[B] = new Test[B](temp)
}
object CovariantGeneric extends App {
class Test2[+A]{ def run[B >: A](element: B)=print("working")
}
val temp2 =new C() // new C() = Fail
new Test2[B]().run(temp2)
}
Apply
//whereby the compiler converts f(a) into f.apply(a)
object Applytest extends App{
class Foo(x: Int) { def apply(y: Int) =x+y}
val f = new Foo(3)
println(f(4)) // returns 25
}
Partial Function
/*
function is f: X -> Y,
A partial function = Does not force f to map every element of X to
an element of Y
ie., several subpartial function to handle differnt elements in same data
set
new PartialFunction[input , output]
if "isDefined" is true than execute "apply"
orElse, andthen
*/
object Partialtest extends App{
val sample = 1 to 5
val isEven = new PartialFunction[Int, String] {
def apply(x: Int) = x + " is even"
def isDefinedAt(x: Int) = (x != 0 && x%2 ==
0)
}
val isOdd: PartialFunction[Int, String] = {
case x if x % 2 == 1 => x + " is odd"
}
val evenNumbers = sample map (isEven orElse isOdd)
print(evenNumbers)
}
Companion Object
/*
Companion object and its class can access each other’s private members
(fields and methods)
Have same name
Same file
*/
object CompanionTest extends App{
class Person {var name = ""}
object Person {
def apply(name: String): Person = {
var p = new Person()
p.name = name
p
}
}
print(Person("Fred Flinstone").name) //Person.apply("Fred
Flinstone").
}
Future
/*
Anything inside Future {}, is run in a different thread
Application’s main thread doesn’t stop for Future to Complete
Result of Future is always Try types: Success or Failure
To make main thread wait scala.concurrent.Await.result(future,15.seconds)
is used
isComplete , value ,map , collect
*/
object FutureTest extends App{
import scala.concurrent.Future
import scala.concurrent.ExecutionContext.Implicits.global
import scala.util.{Failure, Success}
val f1:Future[Int] = Future { Thread.sleep(1000); 21 + 21 }
while(f1.isCompleted!=true){println("future operation completed ??
- "+f1.isCompleted)}
println(f1.value)
val f2:Future[Int]=f1.map(i => i+1)
f2.onComplete {
case Success(value) => println(s"Got the callback, value
= $value")
case Failure(e) => e.printStackTrace
}
}
Implicit
object ImplicitTest extends App{
case class Person(name: String) {def greet = println(s"Hi, my name
is $name")}
implicit def fromStringToPerson(name: String) = Person(name)
"Peter".greet
}
Thursday, October 14, 2021
IBMCLOUD
IBMCLOUD
Index:
- Basics
- Pre-Req
- Free CommandLine Tool
- Create Free Application
- API Keys
- Getting oAuth Tokens
- Standalone
- Ibm CLI tool
- Create AI application
- Cloudant Database
- Fetch the Clouddant Document from API
- Functions
- API GateWay
- Simple ETL from COS to DB2
- Copy ETL using REST
- Run Spark Job on COS
Basics
- IAM = Shared Account
- Provisioning= Create an App
- Helm Charts = Add Addons to the Provisioned App
- There are 3 Types of App
- Classic Infrastructure - For Individuals
- IAM Managed Services - For Enterprise / Resource Groups
- Cloud Foundary - Open Source
Pre-Req
- open ibmcloud
- create a free account
- Login as directed
Free CommandLine with python3.8+
- Login to ibmcloud
- On the tool bar of Landing Page, Click on IBMCloud Shell
- $python3
Create Free Application
- Login to ibmcloud
- click on Catalog
- Search for CloudFoundary
- Click on Cloud Foundary Application >Click on Create
- Add details : Resource ,App Name etc.,
- Click on Create
- Goto homepage > Resource List > CloudFoundaryApp > Click on the app
- Click on link Visit app URL
API Keys
Getting oAuth Tokens
1) Standalone installer (https://cloud.ibm.com/docs/cli?topic=cli-getting-started)
- Run $curl -fsSL https://clis.cloud.ibm.com/install/linux | sh #Linux
- ibmcloud login #ibmcloud login --sso
- ibmcloud iam oauth-tokens
- copy the result
- SET IAM_TOKEN=<paste here>
- Use "Authorization: Bearer IAM_TOKEN"
2) IBMCLOUD CLI
- Log in to IBM Cloud
- select Manage > Security > Platform API Keys.
- Create an API key for your own personal identity,
- copy the value
- Run below
- copy access token and use as below
- Syntax-
- Authorization: Bearer <access_token_value_here>.
- example-
- Authorization: Bearer eyJraWQiOiIyMDE3MDgwOS0wMDoxxxxxxxxx
Create a AI Application - Language Translator
- Login to ibmcloud
- goto to Catalog
- filter :Pricing plan=lite
- Category : Select AI /MAchine Learning
- Click on Language Translator
- Create
- Check on consent on Agreement
- Create
- Copy the api-key . url under : Language Translator >Service Credentials
- Replace api-key and url (More REST calls : Language Translator >GettingStarted)
- open Ibmcloud Shell from the ibmcloud tool bar
- Run the new Command
Cloudant Database
- Login to IBMCloud
- Goto Catalog
- Select and Create a Cloudant Instance
- Open the Cloudant Instance provisioned from Resource List > Services and Software >Cloudant
- Click on Manage > Launch Dashboard
- Create Database > test >Click on Create
- Open test DB > Design Document > New Doc > add new json key value
- Click on Create Document
Lets fetch this document from API
- Under Cloudant page > Service Credentails > Create New Role > Manager >Add
- Open the New Service Credentails Created , Note down apikey , url
- Open ibmcli from ibmcloud tool bar (https://cloud.ibm.com/docs/account?topic=account-iamtoken_from_apikey&interface=api)
- $curl -X POST 'https://iam.cloud.ibm.com/identity/token' -H 'Content-Type: application/x-www-form-urlencoded' -d 'grant_type=urn:ibm:params:oauth:grant-type:apikey&apikey=<MY_APIKEY>'
- Copy the Token generated
- Run below commands
Other Api:
Ref :
Functions
- Login to IBMCloud
- catalog > search and click Functions
- Click on StartCreating
- Select QuickStart templates > Hello World
- select python3 > clk Deploy
Test1:
- click Invoke:Result - {"greeting": "Hello stranger!"}
- click Invoke with parameters:{"name":"deepak"}
- click Invoke :Result- {"greeting": "Hello deepak!"}
Test2
- Open ibmCloud Cli
- curl -u xxxxxxx-xxxx-xxxx-xxxx-xxxxxxxxxx:xxxxxxxxxxxxxxxxxxxxxxxxxxxxxxxxxx \
- -X POST https://eu-gb.functions.cloud.ibm.com/api/v1/namespaces/j.thepac%40gmail.com_dev/actions/hello-world/helloworld?blocking=true
Test3
API GateWay (Proxy) :
Simple ETL from COS to DB2
Pre- Req:
DB2:
- Make sure u have created a DB2 instance in IBMCLoud
- Create a table in DB2 (do not insert any records)
- CREATE TABLE table_name (col1 int, col1 varchar(255)); -- successfully created
- In Db2 Ui > Data icon > Tables
- Click on the scheme
- check if the table is created
- Test it
- Syntax : Select * from scheme.table;
- Example:Select * from DXC02390.table_name;
- note down the Scheme name and table name
- Click on about icon in DB2 UI
- Note down from "<crn ..........::>"
Cloudant:
- Create a Cloudant Object Storage (COS) in IBM Cloud
- Create a Bucket
- Add a parq File , with scheme similar to the above Table created (use apache spark to create the file locally and drag and drop)
- select the uploaded parq file > Object Details > copy Object SQL URL
Steps:
- Create SQL Query instance in ibmcloud
- Run the below command to copy the data from COS to DB2
INTO
crn:v1:bluemix:public:dashdb-for-transactions:eu-gb:a/e31b7085afca4ab8b6ac9b1077cd8af9:9257e5bc-49f0-43a1-b776-f7a0ff41b2b6::/DXC02390.MONOREPO_POC PARALLELISM 2
Copy ETL using REST
Get Current Jobs
Run Spark Job on COS Data
- login to IBMCLOUD
- Goto Catalog > Search for Watson Studio
- Agree to terms and conditions> Click on Create
- Click On next >Next > click Create Watson Studio
- Click on Projects > New Project >Empty Project
- Add to Project > Notebook
- Select Runtime > python (least configuration)
- You can create a job and run the notebook at a specific time and results can be seen in the Jobs tab.
Note :
- Any file you drag and drop in Notebook will automatically get saved into COS .
- Click on insert code to add spark code to work on the Dataframe.
- https://cloud.ibm.com/docs/sql-query
- https://medium.com/codait/analyzing-data-with-ibm-cloud-sql-query-bc53566a59f5
- https://cloud.ibm.com/docs/sql-query?topic=sql-query-data-transport-automation-to-db2-on-cloud
- https://www.ibm.com/cloud/blog/announcements/automate-serverless-data-pipelines-for-your-data-warehouse-or-data-lakes
- https://dataplatform.cloud.ibm.com/exchange/public/entry/view/4a9bb1c816fb1e0f31fec5d580e4e14d
- https://cloud.ibm.com/docs/sql-query?topic=sql-query-sql-reference
- https://video.ibm.com/playlist/633112 #https://www.youtube.com/watch?v=s-FznfHJpoU
- https://cloud.ibm.com/apidocs/sql-query-v3#introduction #REST
- https://cloud.ibm.com/apidocs/db2-on-cloud/db2-on-cloud-v4
- https://video.ibm.com/playlist/633075 #jupyter notebook
- https://cloud.ibm.com/docs/AnalyticsEngine?topic=AnalyticsEngine-working-with-sql#running-spark-sql-with-scala
- https://github.com/IBM-Cloud/sql-query-clients
- https://github.com/IBM-Cloud/sql-query-clients/tree/master/Python
Monday, October 11, 2021
Bazel
Creating Bazel Project
Fast Step up Guide
1. make sure bazel is installed in your computer
2. create a new folder as Project
3. cd inside the project folder
4. create a new "WORKSPACE" file
5. create python/Program folder
6. cd to Program
7. Create a new file BUILD file:
package(default_visibility = ["//visibility:public"])
py_binary(
name = 'hello', #anyname
main = 'hello.py', #reference path eg: parentfolder.file
srcs= ['hello.py'], #filename
)
8. $echo "print('hi')" > hello.py
9. make sure ur in folder containing BUILD file
10. $bazel run hello
Bazel has default setting for Python and Java ie., u can start with empty WORKSPACE and run python/java source files .
Refer for other languages:
https://docs.bazel.build/versions/4.2.1/rules.html
Other Languages (example scala):
- start with http_archive -support to download package from https
load("@bazel_tools//tools/build_defs/repo:http.bzl", "http_archive")
- Download skylib - support for shell command
skylib_version = "0.8.0"
http_archive(
    name = "bazel_skylib",
    type = "tar.gz",
    url = "https://github.com/bazelbuild/bazel-skylib/releases/download/{}/bazel-skylib.{}.tar.gz".format (skylib_version, skylib_version),
    sha256 = "2ef429f5d7ce7111263289644d233707dba35e39696377ebab8b0bc701f7818e",
)- Load
- rules_scala : like scala_binary,scala_test etc., to use in BUILD file
- scala_config : Config scala version
- scala_register_toolchain : For using the jar file build from 1 languge as input to another
- scala repositories : to download default libraries for scala
- Set maven as third party repo
IntelliJ Setup
1. Make sure intelliJ has bazel plugin installed
2. import above project as basel project
3. create new
4. next ( if u already have .ijwb/ folder created , make sure it is deleted)
5. done
Common Commands :
- bazel build target #target can be name of build or //path of package:target
- bazel run target
- bazel test target
- bazel coverage target
- bazel query deps(target)
- bazel fetch target
- bazel version
- bazel clean --expunge
Advantages:
- Google product
- Language independent
- Platform Independent (MAc, Linux etc)
- Hermatic ( build exactly every time )
- Cross Langauge Dependencies (Python libarary can call Java binary etc., )
- Large Code base
- Caches Dependencies
- Parallel Builds
- Enable Remote (download Dependencies at remote)
- Dependency Tree Feature
- Query Dependencies
Cons :
- Network Dependency (1st time and new Dependency)
- Enlist every Dependency (ie., If Dependency is using another Dependency. It has to be decalared)
- Manually Decalaring all Dependencies might have version conflicts when 1 library uses 1 version and other another
Features
- Bazel follows python syntax
- Workspace: Workspace is a Folder with WORSPACE file also called as Bazel Repo.
- package :Is a Folder inside Bazel Repo with BUILD file .This folder contains Src code files and other files
- Target :Everything inside your packages can be considered target
- Label:The nomenclature of a target is known as a label. It’s just a way to recognize different targets
- .bazelrc :Settings that are taken into account every time Bazel builds your project.
- buildifier : Used to ensure that all your build files are formatted in a similar fashion
WORSPACE file
Enlists all external repo the bazel repo is dependent on
Example :
workspace(name="intro_to_bazel") #name of the workspace
#load("filename","method")
load(“@bazel_tools//tools/builds_defs/repo:git.bzl”, "git_name")
git_name(
name= "com_github_xxx",
commit="xxxxxxxxxxxxxxxx",
remote="https://github.com/xxx"
)
Rule Definition in WORSPACE
- Example:load("//foo/bar:file.bzl", "some_library")
- This code will load the file foo/bar/file.bzl and add the some_library symbol to the environment.
- This can be used to load new rules, functions or constants (e.g. a string, a list, etc.).
- *_binary rules build executable programs in a given language. After a build, the executable will reside in the build tool's binary output tree
- *_library rules specify separately-compiled modules in the given programming language
- *_test rules are a specialization of a *_binary rule, used for automated testing
Note :
- https://github.com/bazelbuild/examples/tree/main/java-tutorial
- In this project WORKSPACE is empty because Native rules ship with the Bazel binary and do not require a load statement. Native rules are available globally in BUILD files.
- But for scala ,python etc u need to include load statements in workspace and use them in Build files
Steps:
- Open link https://github.com/bazelbuild
- select repos u need for creating ur project
- Example if u want to add "bazel-skylib" (Provides functions , file paths, and data types in build file)
####### WORSPACE ########
load("@bazel_skylib//:workspace.bzl", "bazel_skylib_workspace")
bazel_skylib_workspace()
BUILD File
load("@bazel_skylib//lib:paths.bzl", "paths")
load("@bazel_skylib//lib:shell.bzl", "shell")
p = paths.basename("foo.bar")
s = shell.quote(p)
- Since scala does not directly ship with bazel u need to include the "rules_scala" from bazelbuild in Workspace
- And Use scala_binary , scala_library scala_test etc., to build and test
BUILD
- Folder with BUILD is called Package
- Contains rules. scala_binary, java_binary etc.,
Example:
common/BUILD
scala_library(
name = "common",
srcs = glob(["*.scala"]),
visibility = ["//visibility:public"],
)
source/BUILD
scala_binary(
name = "eid",
srcs = glob(["filename.scala"]),
main_class = "com.company.project.filename",
deps = [
"//path/common",
]
)
- xxx_library takes sources , targets and label (ie., path for other Bazel Packages)
- xxxx_library create a libarary
- //packagename:target
- // - root
- packagename - name of the Builds
- target - particular target inside a package
- srcs dependencies :Files consumed directly by the rule or rules that output source files.
- deps dependencies: Rule pointing to separately-compiled modules providing header files, symbols, libraries, data, etc.
- data dependencies:A build target might need some data files to run correctly.
Query Dependencies
- bazel query "deps(//foo)"
- bazel query "allpaths(//foo, third_party/...)"
- bazel query --noimplicit_deps 'deps(//package:target)' --output graph | dot-Tpng >graph.png
- bazel query --noimplicit_deps 'deps(target)' --output graph | dot-Tpng >graph.png
- bazel query --noimplicit_deps 'deps(microservice)' --output graph | dot-Tpng >graph.png
- bazel query --noimplicit_deps 'deps(microservice)' --output graph > simplified_graph.in
- bazel query 'foo/...' --output package # What packages exist beneath foo?
- bazel query 'kind(rule, foo:*)' --output label_kind #What rules are defined in the foo package?
- bazel query 'kind("generated file", //foo:*)' #What files are generated by rules in the foo package?
- bazel query 'attr(generator_function, foo, //path/to/search/...)' #What targets are generated by starlark macro foo?
- bazel query 'buildfiles(deps(//foo))' | cut -f1 -d: #What's the set of BUILD files needed to build //foo?
- bazel query 'tests(//foo:smoke_tests)' #What are the individual tests that a test_suite expands to?
- bazel query 'kind(cc_.*, tests(//foo:smoke_tests))' #Which of those are C++ tests?
- bazel query 'attr(size, small, tests(//foo:smoke_tests))' #Which of those are small? Medium? Large?
- bazel query 'filter("pa?t", kind(".*_test rule", //foo/...))' #What are the tests beneath foo that match a pattern?
- bazel query path/to/file/bar.java --output=package #What package contains file path/to/file/bar.java?
- bazel query path/to/file/bar.java #What is the build label for path/to/file/bar.java?
- bazel query 'buildfiles(deps(//foo:foo))' --output package #What packages does foo depend on?
- bazel query 'deps(foo/... except foo/contrib/...)' --output package #What packages does the foo tree depend on, excluding foo/contrib
- bazel query 'kind(genproto, deps(bar/...))' #What genproto rules does bar depend upon
- bazel query 'kind("source file", deps(//path/to/target/foo/...))' | grep java$ #What file dependencies exist
- bazel query 'deps(//foo) except deps(//foo:foolib)' #What targets does //foo depend on that //foo:foolib does not?
- bazel query 'somepath(bar/...,groups2/...:*)' #Why does bar depend on groups2
Rules
Ref:
- https://www.youtube.com/watch?v=e9dlx2ilwr0&t=276s
- https://semaphoreci.com/blog/bazel-build-tutorial-examples
- https://docs.bazel.build/versions/3.3.0/be/overview.html
- https://docs.bazel.build/versions/3.3.0/build-ref.html#workspaces
- https://github.com/bazelbuild/rules_scala#getting-started
- https://docs.bazel.build/versions/4.2.1/tutorial/java.html
- https://github.com/bazelbuild/examples
- https://docs.bazel.build/versions/4.2.1/rules.html
Sunday, October 10, 2021
Java Package Names and Naming Convention:
Java Package Names and Naming Convention:
- If you're just doing personal projects where nobody else will use the code, then you can make any name .
- Don't make up something that starts with com. or net. or other top-level domain though, because that would imply that you own the domain name (ie. using com.john as your package name just because your name happens to be John is not a good idea).
- The domain-name-backwards convention is there to prevent name collisions. Two different companies with the same product name will have different namespaces so everything works fine.
Ref:
- https://stackoverflow.com/a/292175
- https://docs.oracle.com/javase/tutorial/java/package/namingpkgs.html
- https://stackoverflow.com/a/6247924
Thursday, September 30, 2021
Scala - Requests
Scala - Requests
link:
https://index.scala-lang.org/com-lihaoyi/requests-scala/requests/0.6.9?target=_3.x
"com.lihaoyi" %% "requests" % "0.6.5" // sbt
compile "com.lihaoyi:requests_2.12:0.6.5" //gradle
val r = requests.get("https://api.github.com/users/lihaoyi")

r.statusCode
// 200

r.headers("content-type")
Saturday, September 11, 2021
Scala -Java : Convert String to Json
Scala -Java : Convert String to Json
Code (Maven / https://mvnrepository.com/artifact/com.google.code.gson/gson):
import com.google.gson.{Gson, JsonParser}
val json="""{"hello": "world", "age": 42}"""
val parser:JsonParser= new JsonParser();
val res= parser.parse(json).getAsJsonObject()
println(res.get("hello")) // world
//read from file
//val path="/path/file.json"
//val lines = scala.io.Source.fromFile(path, "utf-8").getLines.mkString
Code 2 (Requires Lift Web - Maven):
import net.liftweb.json._
import net.liftweb.Serialiazation.write
case class Address(city:String,Country:String)
case class Person(name:String ,address:Address)
implicits def formats=DefaultFormats
print(write(Person("Sam",Address("NY","US"))
python : Setup VS Code
python : Setup VS Code
Steps:
- Make sure VS code is installed
- Install python extension from Microsoft
- run this in shell
import sys
for pth in sys.path:print(pth)
- Goto > Preferences>Settings >users
- Search for Python > Python Path >add path "/usr/lib/python39/python.exe"
- At the bottom you should see the interpreter name
Pylint
- Ctrl+shift+P
- Search for Python:Select Linter
- Choose pylint and enable
Saturday, August 21, 2021
Bootstrap
Bootstrap
Pre-Req:
- downloadand install VSCode
- Start with base html
- https://getbootstrap.com/docs/5.1/getting-started/introduction/#starter-template
- Copy paste individual components from Bootstrap Document
Class :
- Used to add extra features(like color , size etc)
- classes + spaces = add new property to the element
- <button type="button" class="btn btn-secondary btn-sm">Primary</button>
ID : Used to identify the component
Image
- img src="https://source.unsplash.com/400x400/?code"
- "https://source.unsplash.com/1200x300/?van"
- If u have a file place in the same folder and img src="1.jpg"
- Dont put components inside other components Eg:Button inside paragraph
- Image Centering - <img src="..." class="rounded mx-auto d-block" alt="...">
- https://getbootstrap.com/docs/4.0/content/images/
Image Background
django:
Color
- <button type="button" class="bg-danger">name</button>
- bg-danger = Red
- bg-warning = Yellow
- bg-success = Green
- bg-primary = blue
- bg-light
text Color
- <p class="text-white bg-dark">.text-white</p>
- <p class="text-light">.text-black-50</p>
- <p class="text-white-50 bg-dark">.text-white-50</p>
- <p class="text-success">.text-success</p>
container
- <div class="container"></div>
- Bootstrap > Container > Grid
- Bootstrap gives max of 12 columns in a row
- If "col-3" = use 3 column to make 1 column out of 12 .So now user is left wtih 9 columns
Example :
<div class="container">
<div class="row bg-light">
<div class="col-10 bg-danger"> 10 of 12</div>
<div class="col-2 bg-danger"> remaining 2 0f 2</div>
</div>
</div>
- It can be configured for different mobile devices as well
- if "col-md-10 col-sm-6" means in medium device use size 10 and small device use size 6
Margins , Spacing and Padding:
- Create a new container
- add "my-1" inside the class
- U can give margins 1-4
- my-l = left
- <div class ="row gx-5"> = horizontal gutters
- <div class ="row gy-5"> = vertical gutter
- <div class ="row g-5"> =horz+vert gutter
<div class="container"> <div class="row row-cols-2 row-cols-lg-5 g-2 g-lg-3">- <div class ="row px-5"> =padding
- https://getbootstrap.com/docs/5.1/utilities/vertical-align/
- https://getbootstrap.com/docs/5.1/utilities/spacing/
- https://getbootstrap.com/docs/5.1/utilities/position/
Using Examples (https://getbootstrap.com/docs/5.1/examples/):
- goto Examples in Bootstrap
- open any Example
- Inspect the element in Browser
- Add a new container in the html
- Paste the element inside the container
Centering
add following to class "d-flex jusify-content-center align-items-center"
Sequencing:
add this to class "order-md-1" /"order-md-2"
Linking html files :
href="about.hml" <!--about.html is a file in the same folder-->
Login Box (Modal):
- Pops up a message box on click on of the button
- https://getbootstrap.com/docs/5.1/components/modal/#static-backdrop
ThumbNail
https://stackoverflow.com/a/8858052
Sunday, June 13, 2021
Sunday, May 16, 2021
Saturday, May 15, 2021
Django - Simple Registration Form
Django - Simple Registration Form
<!DOCTYPE html>
<html lang="en">
<head>
    <meta charset="UTF-8">
    <title>Title</title>
    <p>Register</p>

    <form method="POST" action="">
        {% csrf_token %}
        {{form.username.label}}
        {{form.username}}
        {{form.email.label}}
        {{form.email}}
        {{form.password1.label}}
        {{form.password1}}
        {{form.password2.label}}
        {{form.password2}}
        <input type="submit" name="new_user">


    </form>


</head>
<body>

</body>
</html>
Monday, March 22, 2021
CORRELATED SUBQUERIES
SubQuery :
Simple subquery doesn't use values from the outer query and is being calculated only once:
SELECT id, first_name FROM student_details
WHERE id IN (SELECT student_id FROM student_subjects
WHERE subject= 'Science');
CoRelated Subquery -
Query To Find all employees whose salary is above average for their department
SELECT employee_number, name FROM employees emp
WHERE salary > ( SELECT AVG(salary) FROM employees
WHERE department = emp.department);
Sunday, March 14, 2021
Saturday, March 13, 2021
FastApi : Create Production ready Api
FastApi : Create Production ready Api (faster than Flask)
https://fastapi.tiangolo.com/
Features
1. Asynchronous
2. High Perfromance
3. Less Code
4. Data Type and Data Models auto Conversions
5. Auto Documentation
- swagger (/docs)
- ReDoc (/redoc)
Pre-Req:
Install and activate virtual environment to be safe.
Steps:
- pip install fastapi
- pip install hypercorn #server
- touch main.py
- copy paste below code
- hypercorn main:app --reload
Friday, February 5, 2021
Sunday, January 31, 2021
CIRCUITPYTHON :SEEEDUINO XIAO [SEED]
CIRCUITPYTHON :SEEEDUINO XIAO
Steps:
Uses SAMD21 Processor
1. connect SEEEDuino xiao to PC using TYPE-C cable
2. short RST pins using a cable fast , 2 times.
3. Once done successfully,Audrino drives appears
4. Go website -
https://circuitpython.org/board/seeeduino_xiao/
https://wiki.seeedstudio.com/Seeeduino-XIAO-CircuitPython/
5. Download latest .UF2 file
6. Copy and paste it inside the drive
7. Now the drive will be converted to CIRCUITPY
8. Create a file code.py
9. Copy paste below code into code.py (same for all circuit py IC)
import time
import board
from digitalio import DigitalInOut,Direction
led = DigitalInOut(board.D13) #D13 is a built in LED
#A1 - A10 can be used as well if u use a separate LED and a Resistor 100 - 400 ohms refer below for calculations
led.direction=tinker .OUTPUT
while True:
led.value = True
time.sleep(1)
led.value=False
time.sleep(1)
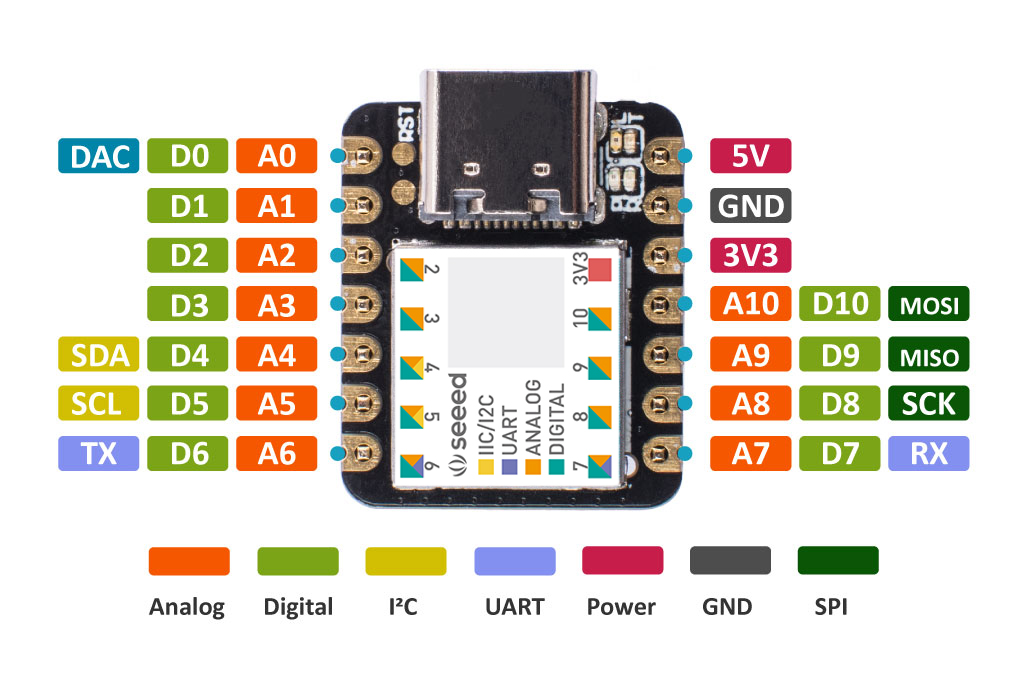
10. Save file
11. The LED should start blinking
A simple LED circuit consists of a LED and resistor. The resistor is used to limit the current that is being drawn and is called a current limiting resistor. Without the resistor the LED would run at too high of a voltage, resulting in too much current being drawn which in turn would instantly burn the LED, and likely also the GPIO port.
To calculate the resistor value we need to examine the specifications of the LED. Specifically we need to find the forward voltage (VF) and the forward current (IF).
A regular red LED has a
forward voltage (VF) of 1.7V
forward current of 20mA (IF).
output voltage of the IC which is 3.3V.
We can then calculate the resistor needed-